Integrated VT100 driver: Difference between revisions
No edit summary |
|||
| (7 intermediate revisions by the same user not shown) | |||
| Line 5: | Line 5: | ||
[[Image:VT100_1.jpg||center]]<br/> | [[Image:VT100_1.jpg||center]]<br/> | ||
References: | <big>'''References:'''</big> | ||
For information on the VT100 driver and MVT100 video adapter: | For information on the VT100 driver and MVT100 video adapter: | ||
[[VT100|MVT100 information]] | [[VT100|MVT100 information]] | ||
For the original TRS-80 DVI User guide (Disk BASIC commands): | For the original TRS-80 DVI User guide (Disk BASIC commands): | ||
[[Media:DVI.zip|Disk Video Interface / Disk BASIC Overview]] | [[Media:DVI.zip|Disk Video Interface / Disk BASIC Overview]] | ||
For information about modifying the BCR port to support external video: | |||
[[BCR_TTL_SERIAL_HACK|BCR Hack Information]] | |||
= Overview = | = Overview = | ||
| Line 56: | Line 65: | ||
= VT100 Driver Status Indicator = | |||
REX#/REXCPM both display configuration information to the user when installed, and when in MENU. | |||
Normally, the display is changed to show the following things: | |||
1) Year is changes to "20" from "19" | |||
2) the current active OPTROM image is shown on the top left. | |||
Now, REX#/REXCPM displays the status of the VT100 driver. See the image below. | |||
[[Image:VT100_status.jpg||center]]<br/> | |||
The status of the VT100 driver is shown on the top right of the MENU screen, just to the left of the active OPTROM indicator. | |||
There are 2 status items shown - a letter and a number. Here is the decoder: | |||
D == DeInstalled. The driver is "off" | |||
S == Safe Mode. The driver is installed and active, and OPTROM access is disabled. | |||
E == Expert Mode. The driver is installed and active, and OPTROMs are enabled, so be careful! | |||
0 == SCREEN is set to 0, meaning LCD. | |||
1 == SCREEN is set to 1, meaning CRT over RS-232 @ 19200 8N1 | |||
2 == SCREEN is set to 2, meaning CRT over BCR Hack @ 57600 8N1 | |||
= Supported DISK BASIC Commands = | |||
Here is a list of DISK BASIC commands enabled by VT100 driver. | |||
SCREEN | |||
OPEN | |||
CLOSE | |||
PRINT# | |||
PRINT@ | |||
CSRLIN | |||
POS | |||
+ Escape codes as listed in the DVI User Guide. | |||
Note: | |||
WIDTH is always assumed to be 80 columns in SCREEN 1/2. | |||
So this command is not supported. | |||
Latest revision as of 05:40, 10 January 2021
REX#/REXCPM Integrated VT100 Driver
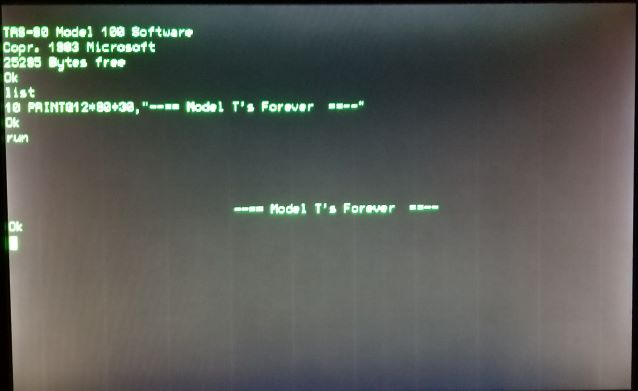
Add 80x24 external video to your M100!!!
References:
For information on the VT100 driver and MVT100 video adapter:
For the original TRS-80 DVI User guide (Disk BASIC commands):
Disk Video Interface / Disk BASIC Overview
For information about modifying the BCR port to support external video:
Overview
Starting with "Version 2" REX# and REXCPM Manager software, 80x24 displays can be directly driven by the M100 over either RS-232 interface, over the "BCR HACK" TTL serial interface.
The VT100 driver makes use of video related commands specified in the DVI User guide. When enabled, the user can redirect BASIC, TEXT, ADDRS, SCHED and TELCOM functions to either
- the LCD (aka SCREEN 0)
- the RS-232 port (SCREEN 1, 19200 baud, 8N1)
- the BCR port (SCREEN 2, 57600 baud, 8N1, TTL)
It is strongly suggested that the user read the DVI User Guide!
  Note:
  In general, VT100 displays do NOT perfectly support the M100.
  The VT100 command set excludes many functions that the M100 needs.
  So, the VT100 driver is really customized to work with
  the MVT100 external video adapter board.
  ***sounds like a new project***
  ... a Windows/Linux VT100 display that emulates the M100 command set and characters!
Enabling / Disabling the VT100 Driver
The integrated VT100 driver is enabled or disabled via a Quick Menu function, CNTL-V. In MENU, when REX Manager is installed, pressing CNTL-V pulls up a menu that allows the user to select from 3 possible configurations for VT100 driver.
  1.  DeInst:  this option removes all traces of the VT100 driver, and enables full OPTION ROM use.
  2.  SAFE:    Safe mode allows the user to use VT100 (Disk BASIC) and DISABLES OPTION ROMS.
  3.  EXPERT:  Expert mode enables VT100 and also enables OPTION ROMS.
  Note about Expert Mode:
  Disk BASIC and VT100 are not really compatible with most OPTION ROMs.  So, in general you have to swap between
  using SAFE mode and DeInstalling VT100 to use OPTION ROM software.
  Rom2 Cleuseau is an exception; it appears to tolerate VT100 operation well.
  So, it is possible to switch to EXPERT mode, and enable R2C100 or R2C1D, and make use of that ROM
  on either SCREEN 1 or SCREEN 2.
The user can freely switch between modes at any time, by returning to MENU and keying CNTL-V.
VT100 Driver Status Indicator
REX#/REXCPM both display configuration information to the user when installed, and when in MENU. Normally, the display is changed to show the following things:
  1)  Year is changes to "20" from "19"
  2)  the current active OPTROM image is shown on the top left.
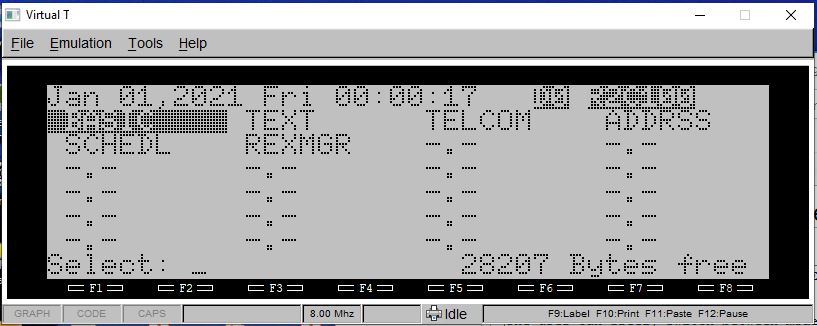
Now, REX#/REXCPM displays the status of the VT100 driver. See the image below.
The status of the VT100 driver is shown on the top right of the MENU screen, just to the left of the active OPTROM indicator.
There are 2 status items shown - a letter and a number. Here is the decoder:
  D == DeInstalled.  The driver is "off"
  S == Safe Mode.  The driver is installed and active, and OPTROM access is disabled.
  E == Expert Mode.  The driver is installed and active, and OPTROMs are enabled, so be careful!

  0 == SCREEN is set to 0, meaning LCD.
  1 == SCREEN is set to 1, meaning CRT over RS-232 @ 19200 8N1
  2 == SCREEN is set to 2, meaning CRT over BCR Hack @ 57600 8N1
Supported DISK BASIC Commands
Here is a list of DISK BASIC commands enabled by VT100 driver.
  SCREEN
  OPEN
  CLOSE
  PRINT#
  PRINT@
  CSRLIN
  POS
  + Escape codes as listed in the DVI User Guide.
  Note:
  WIDTH is always assumed to be 80 columns in SCREEN 1/2.
  So this command is not supported.

