M100 26-3801 24kB SRAM card: Difference between revisions
From Bitchin100 DocGarden
Jump to navigationJump to search
No edit summary |
|||
| (3 intermediate revisions by the same user not shown) | |||
| Line 1: | Line 1: | ||
== Add 24kB to your 8kB M100! == | == Add 24kB to your 8kB M100! == | ||
Have a M100 with only 8kB of RAM? If you open up the laptop, | |||
and Option RAM #1,2,3 are empty then this is for you. | |||
This single card provides 24kB to bring the system up to 32kB, | |||
replacing 3 "standard" M100 8kB RAM modules. | |||
It plugs right in! | |||
(NOTE: intended for PLX110CH1X or PLX110EH1X board revisions only) | |||
Tandy made 2 variants of M100 available - 8kB (26-3801) and 24kB (26-3802). | Tandy made 2 variants of M100 available - 8kB (26-3801) and 24kB (26-3802). | ||
| Line 15: | Line 22: | ||
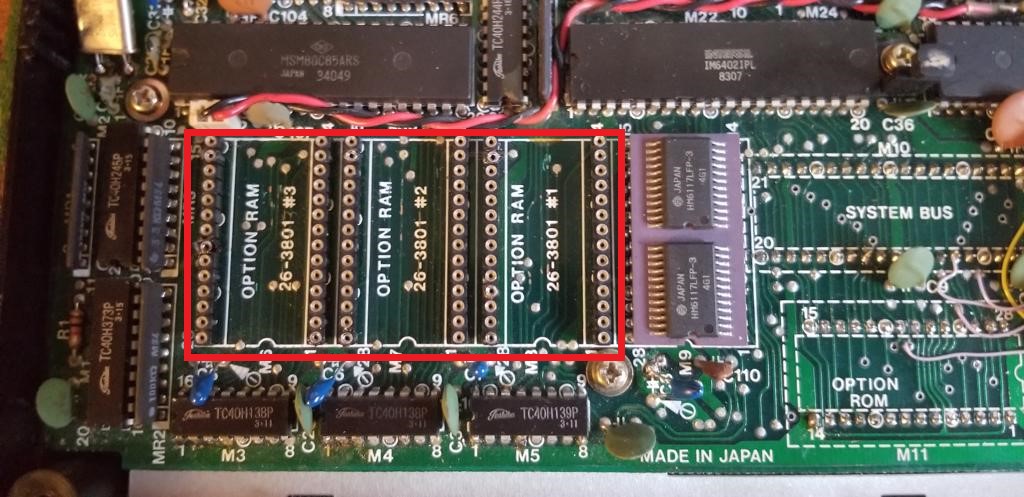
In this image you can see, as indicated by the red box, where the SRAM module should be placed. | In this image you can see, as indicated by the red box, where the SRAM module should be placed. | ||
== Installation == | == Installation == | ||
1. | 1. Remove the 4 screws and separate top from bottom, so you can access the SRAM sockets. | ||
2. Align and orient the SRAM card over the sockets. | 2. Align and orient the SRAM card over the sockets. | ||
You are installing 24kB in Option RAM 1,2,3. | |||
3. Gently bend the resistor packs MR2 and MR3 away from the socket to make some space. | 3. Gently bend the resistor packs MR2 and MR3 away from the socket to make some space. | ||
4. Gently bend the capacitors C5 C6 C7 away from the sockets to make some space. | 4. Gently bend the capacitors C5 C6 C7 away from the sockets to make some space. | ||
| Line 41: | Line 47: | ||
== Memory Test == | |||
Here is Paul Globman's MEMCHK.BA, which creates MEMCHK.CO. | Here is Paul Globman's MEMCHK.BA, which creates MEMCHK.CO. | ||
Load and run the .DO, then run MEMCHK.CO. | |||
Remember, only 1 beep means 'all good!'. | |||
[[Media:MEMCHK_M100.zip|MEMCHK for M100]] | [[Media:MEMCHK_M100.zip|MEMCHK for M100]] | ||
Latest revision as of 14:12, 31 March 2022
Add 24kB to your 8kB M100!
  Have a M100 with only 8kB of RAM?  If you open up the  laptop,
  and Option RAM #1,2,3 are empty then this is for you.
  This single card provides 24kB to bring the system up to 32kB,
  replacing 3 "standard" M100 8kB RAM modules.
  It plugs right in!
  (NOTE: intended for PLX110CH1X or PLX110EH1X board revisions only)
Tandy made 2 variants of M100 available - 8kB (26-3801) and 24kB (26-3802). This card provides an additional 24kB to the 26-3801, for a total of 32kB.
This add-on card plugs into the unused SRAM sockets Option RAM #1,2,3 - and provides an additional 24kB in one go!
M100 (8kB 26-3801)
In this image you can see, as indicated by the red box, where the SRAM module should be placed.
Installation
  1.  Remove the 4 screws and separate top from bottom, so you can access the SRAM sockets.
  2.  Align and orient the SRAM card over the sockets.
      You are installing 24kB in Option RAM 1,2,3.
  3.  Gently bend the resistor packs MR2 and MR3 away from the socket to make some space.
  4.  Gently bend the capacitors C5 C6 C7 away from the sockets to make some space.
  5.  Carefully press the SRAM card until it is fully seated in the sockets.
      Be careful not to bend the pins!
  6.  Reassemble the computer, turn on and run a memory test to confirm the installation is good!
Post-Installation Photos
M100 (8kB 26-3801)
Note: what is shown here is the first prototype. There is a little barnacle on it..please ignore!
Memory Test
Here is Paul Globman's MEMCHK.BA, which creates MEMCHK.CO. Load and run the .DO, then run MEMCHK.CO. Remember, only 1 beep means 'all good!'.

