VT100: Difference between revisions
| (37 intermediate revisions by the same user not shown) | |||
| Line 18: | Line 18: | ||
<big> How to order ---></big>[[Ordering Information]] | <big> How to order ---></big>[[Ordering Information]] | ||
Geoff Graham's VT100 video adapter kit optimized for use with M100. | |||
Notes: | |||
* Requires an RS-232 cable to connect from laptop to video adapter. Adapter has a female DB-9 connector. | |||
* Requires USB power supply | |||
* Compatible with REX#/REXCPM (version 2.1 or newer software) | |||
* For native M100 use, requires VT100 driver software to be installed in Laptop. | |||
* M100 CP/M is ready to use MVT100 out of the box! | |||
* Kits require assembly - soldering skills required! | |||
== Acknowledgements == | == Acknowledgements == | ||
I would like to acknowledge and thank those that have contributed to the project: | I would like to acknowledge and thank those that have contributed to the project: | ||
'''Jim Anderson''' - for his efforts to improve the font set for MVT100 to match M100! | |||
'''Ken Pettit''' - for VirtualT, and the core disassembly of Disk Basic | '''Ken Pettit''' - for VirtualT, and the core disassembly of Disk Basic | ||
| Line 28: | Line 41: | ||
'''Geoff Graham''' - for the original VT100 Terminal Project | '''Geoff Graham''' - for the original VT100 Terminal Project | ||
== Supported Models == | == Supported Models == | ||
* TRS-80 Model 100, Tandy 102 | * TRS-80 Model 100, Tandy 102 | ||
== Assembly and Set up Primer == | |||
Steve Baker, ModelT enthusiast, has been an early adopter of the MVT100 video adapter. | |||
He has kindly pulled together his experiences in assembling and setting up the MVT100. | |||
This document will be very very useful to anyone looking to follow his footsteps! | |||
Thanks Steve! | |||
[[Media:MVT100-Assembly-and-Configuration-MedRes.pdf|MVT100 Assembly and Configuration Guide]] | |||
Keep in mind that Version 3 PCB has 2 new jumpers. JP7 and JP8. | |||
JP8 selects power from USB. | |||
JP7 selects power from pin 9 of the RS-232 connector. | |||
== Mini How-To == | == Mini How-To == | ||
| Line 39: | Line 65: | ||
1. You need a Geoff VT100 Terminal. Get one of these, and get my latest firwmware below. | 1. You need a Geoff VT100 Terminal. Get one of these, and get my latest firwmware below. | ||
'''IMPORTANT''': follow the instructions at Geoff's site for how to get your VT100 terminal working. | |||
Instructions for that are not repeated here. | |||
2. Flash upgrade my firmware onto it following Geoff's instructions. | 2. Flash upgrade my firmware onto it following Geoff's instructions. | ||
PS - it sorta works stock so you can play around with it, without the firmware update. | PS - it sorta works stock so you can play around with it, without the firmware update. | ||
| Line 46: | Line 74: | ||
5. Configure the MVT100 Video Adapter as follows | 5. Configure the MVT100 Video Adapter as follows | ||
- 57600 baud if using the BCR TTL SERIAL HACK or | - 57600 baud if using the BCR TTL SERIAL HACK or | ||
- 19200 8N1 if using normal RS-232. Don't forget to invert the data ( | - 19200 8N1 if using normal RS-232. Don't forget to invert the data (PS2 keyboard Shift F12) | ||
6. Connect M100 to MVT100 Video Adapter. If using RS-232, this is fairly straightforward. | 6. Connect M100 to MVT100 Video Adapter. If using RS-232, this is fairly straightforward. | ||
If using the BCR TTL SERIAL HACK, you need to make a cable | If using the BCR TTL SERIAL HACK, you need to make a cable | ||
This is the hardest part. "Stock" VT100 adapter uses a 4 pin header to connect serial data. | This is the hardest part. "Stock" VT100 adapter uses a 4 pin header to connect serial data. | ||
My board design has a native RS-232. | My board design has a native RS-232. | ||
In any case; you | In any case; you have to sort out how to connect these up. | ||
7. Load and install the VT100 Driver into the M100. | 7. Load and install the VT100 Driver into the M100. | ||
You should be ready to go! Enter BASIC, type SCREEN 1 (for RS-232) or SCREEN 2 (for BCR/CASSETTE) | You should be ready to go! Enter BASIC, type SCREEN 1 (for RS-232) or SCREEN 2 (for BCR/CASSETTE) | ||
SCREEN 0 returns you to normal screen. From BASIC, F8 returns to MENU which is always LCD, and from | SCREEN 0 returns you to normal screen. From BASIC, F8 returns to MENU which is always LCD, and from | ||
there TEXT and TELCOM also use 80x24. | there TEXT and TELCOM also use 80x24. | ||
NOTE: | |||
* You can test your VT100 terminal using TELCOM. | |||
| Line 67: | Line 98: | ||
Make sure you are in 80 column mode on CRT! | Make sure you are in 80 column mode on CRT! | ||
== | == MVT100 Hardware == | ||
There are several sources for the original VT100 Adapter, and modified variants. I have developed a PCB version (MVT100)that is, I think, most convenient for Model T users as it has a native DE-9 connector for serial data connection. | There are several sources for the original VT100 Adapter, and modified variants. I have developed a PCB version (MVT100) that is, I think, most convenient for Model T users as it has a native DE-9 connector for serial data connection. | ||
I have revised the design to V3. | |||
This design adds two power jumpers. | |||
These jumpers allow the MVT100 to be powered from USB or the DE-9. | |||
USB power - place JP8 and remove JP7. | |||
DE-9 power pin 9 - place JP7 and remove JP8. | |||
Why did I add the power jumpers? | |||
Well, the M100 can supply enough current from it's internal 5V power supply. | |||
Since the BCR port has 5V on pin 9, you can avoid using USB altogether. | |||
Easier to connect, less wires etc. | |||
Contact me to obtain a kit for MVT100, my variant of the VT100 Adapter, including the revised firmware. | |||
[[Image:MVT100_assembled.jpg||center]]<br/> | |||
Contact me to obtain a kit for MVT100, my variant of the VT100 Adapter, including the controller pre-programmed with the revised firmware. | |||
Other sources are available. See | Other sources are available. See | ||
| Line 89: | Line 137: | ||
=== MVT100 PCB === | === MVT100 PCB Version 2 (no longer supplied) === | ||
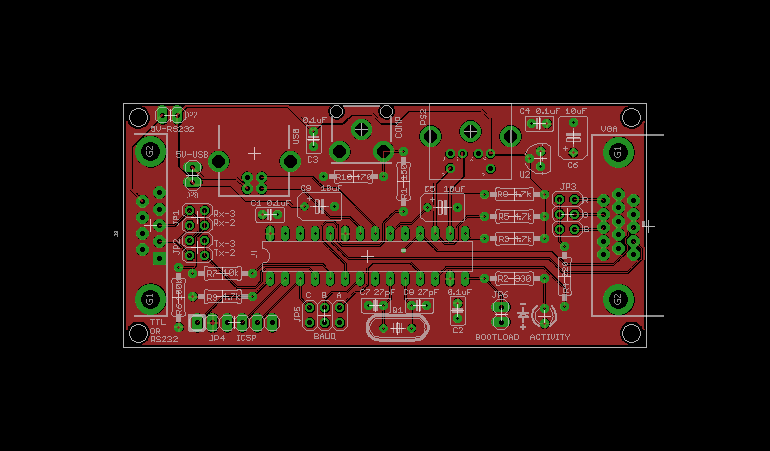
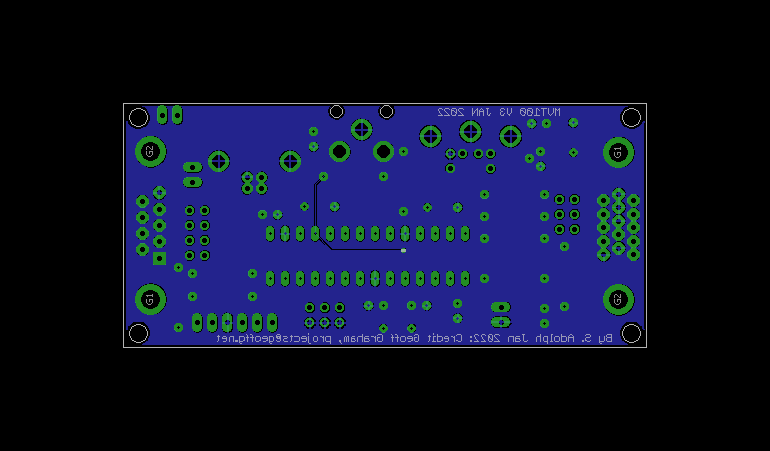
PCB images: | |||
[[Image:MVT100_primary.png||center]]<br/> | [[Image:MVT100_primary.png||center]]<br/> | ||
[[Image:MVT100_secondary.png||center]]<br/> | [[Image:MVT100_secondary.png||center]]<br/> | ||
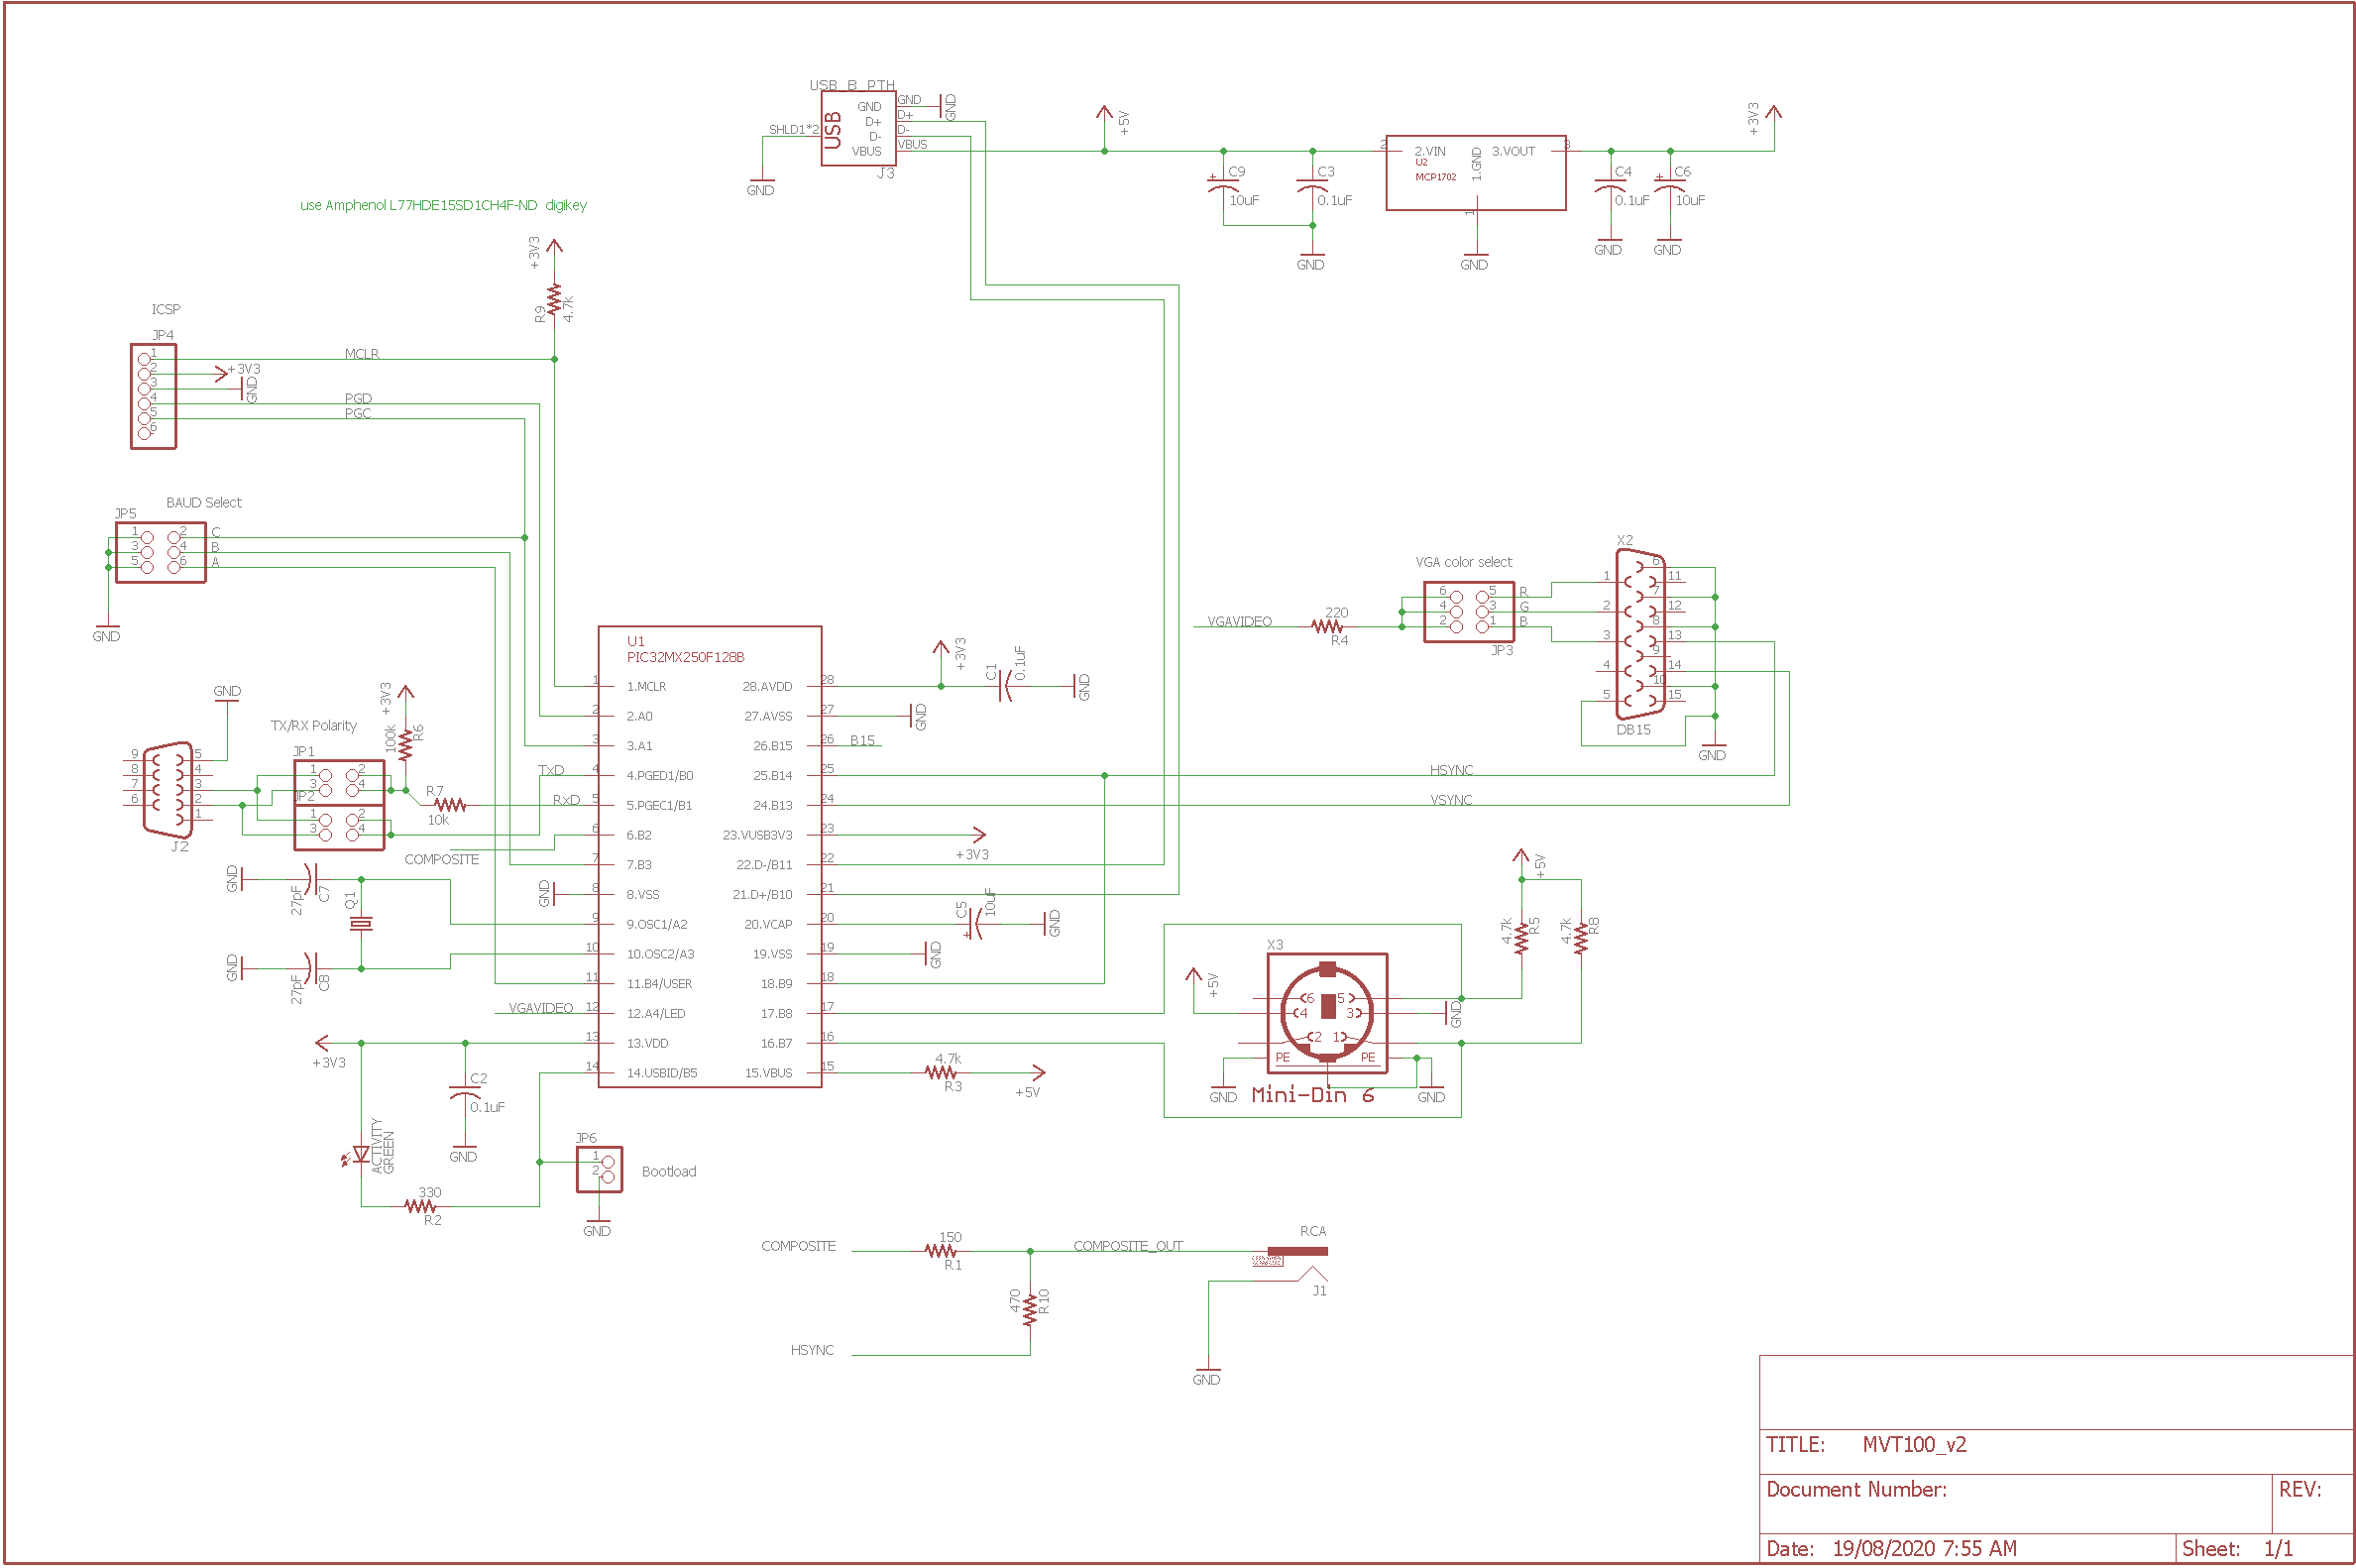
=== MVT100 | Schematic: | ||
[[Image:MVT100_V2.png||center]]<br/> | |||
=== MVT100 PCB Version 3 (January 2022) === | |||
PCB images: | |||
[[Image:MVT100_v3_primary.png||center]]<br/> | |||
[[Image:MVT100_v3_secondary.png||center]]<br/> | |||
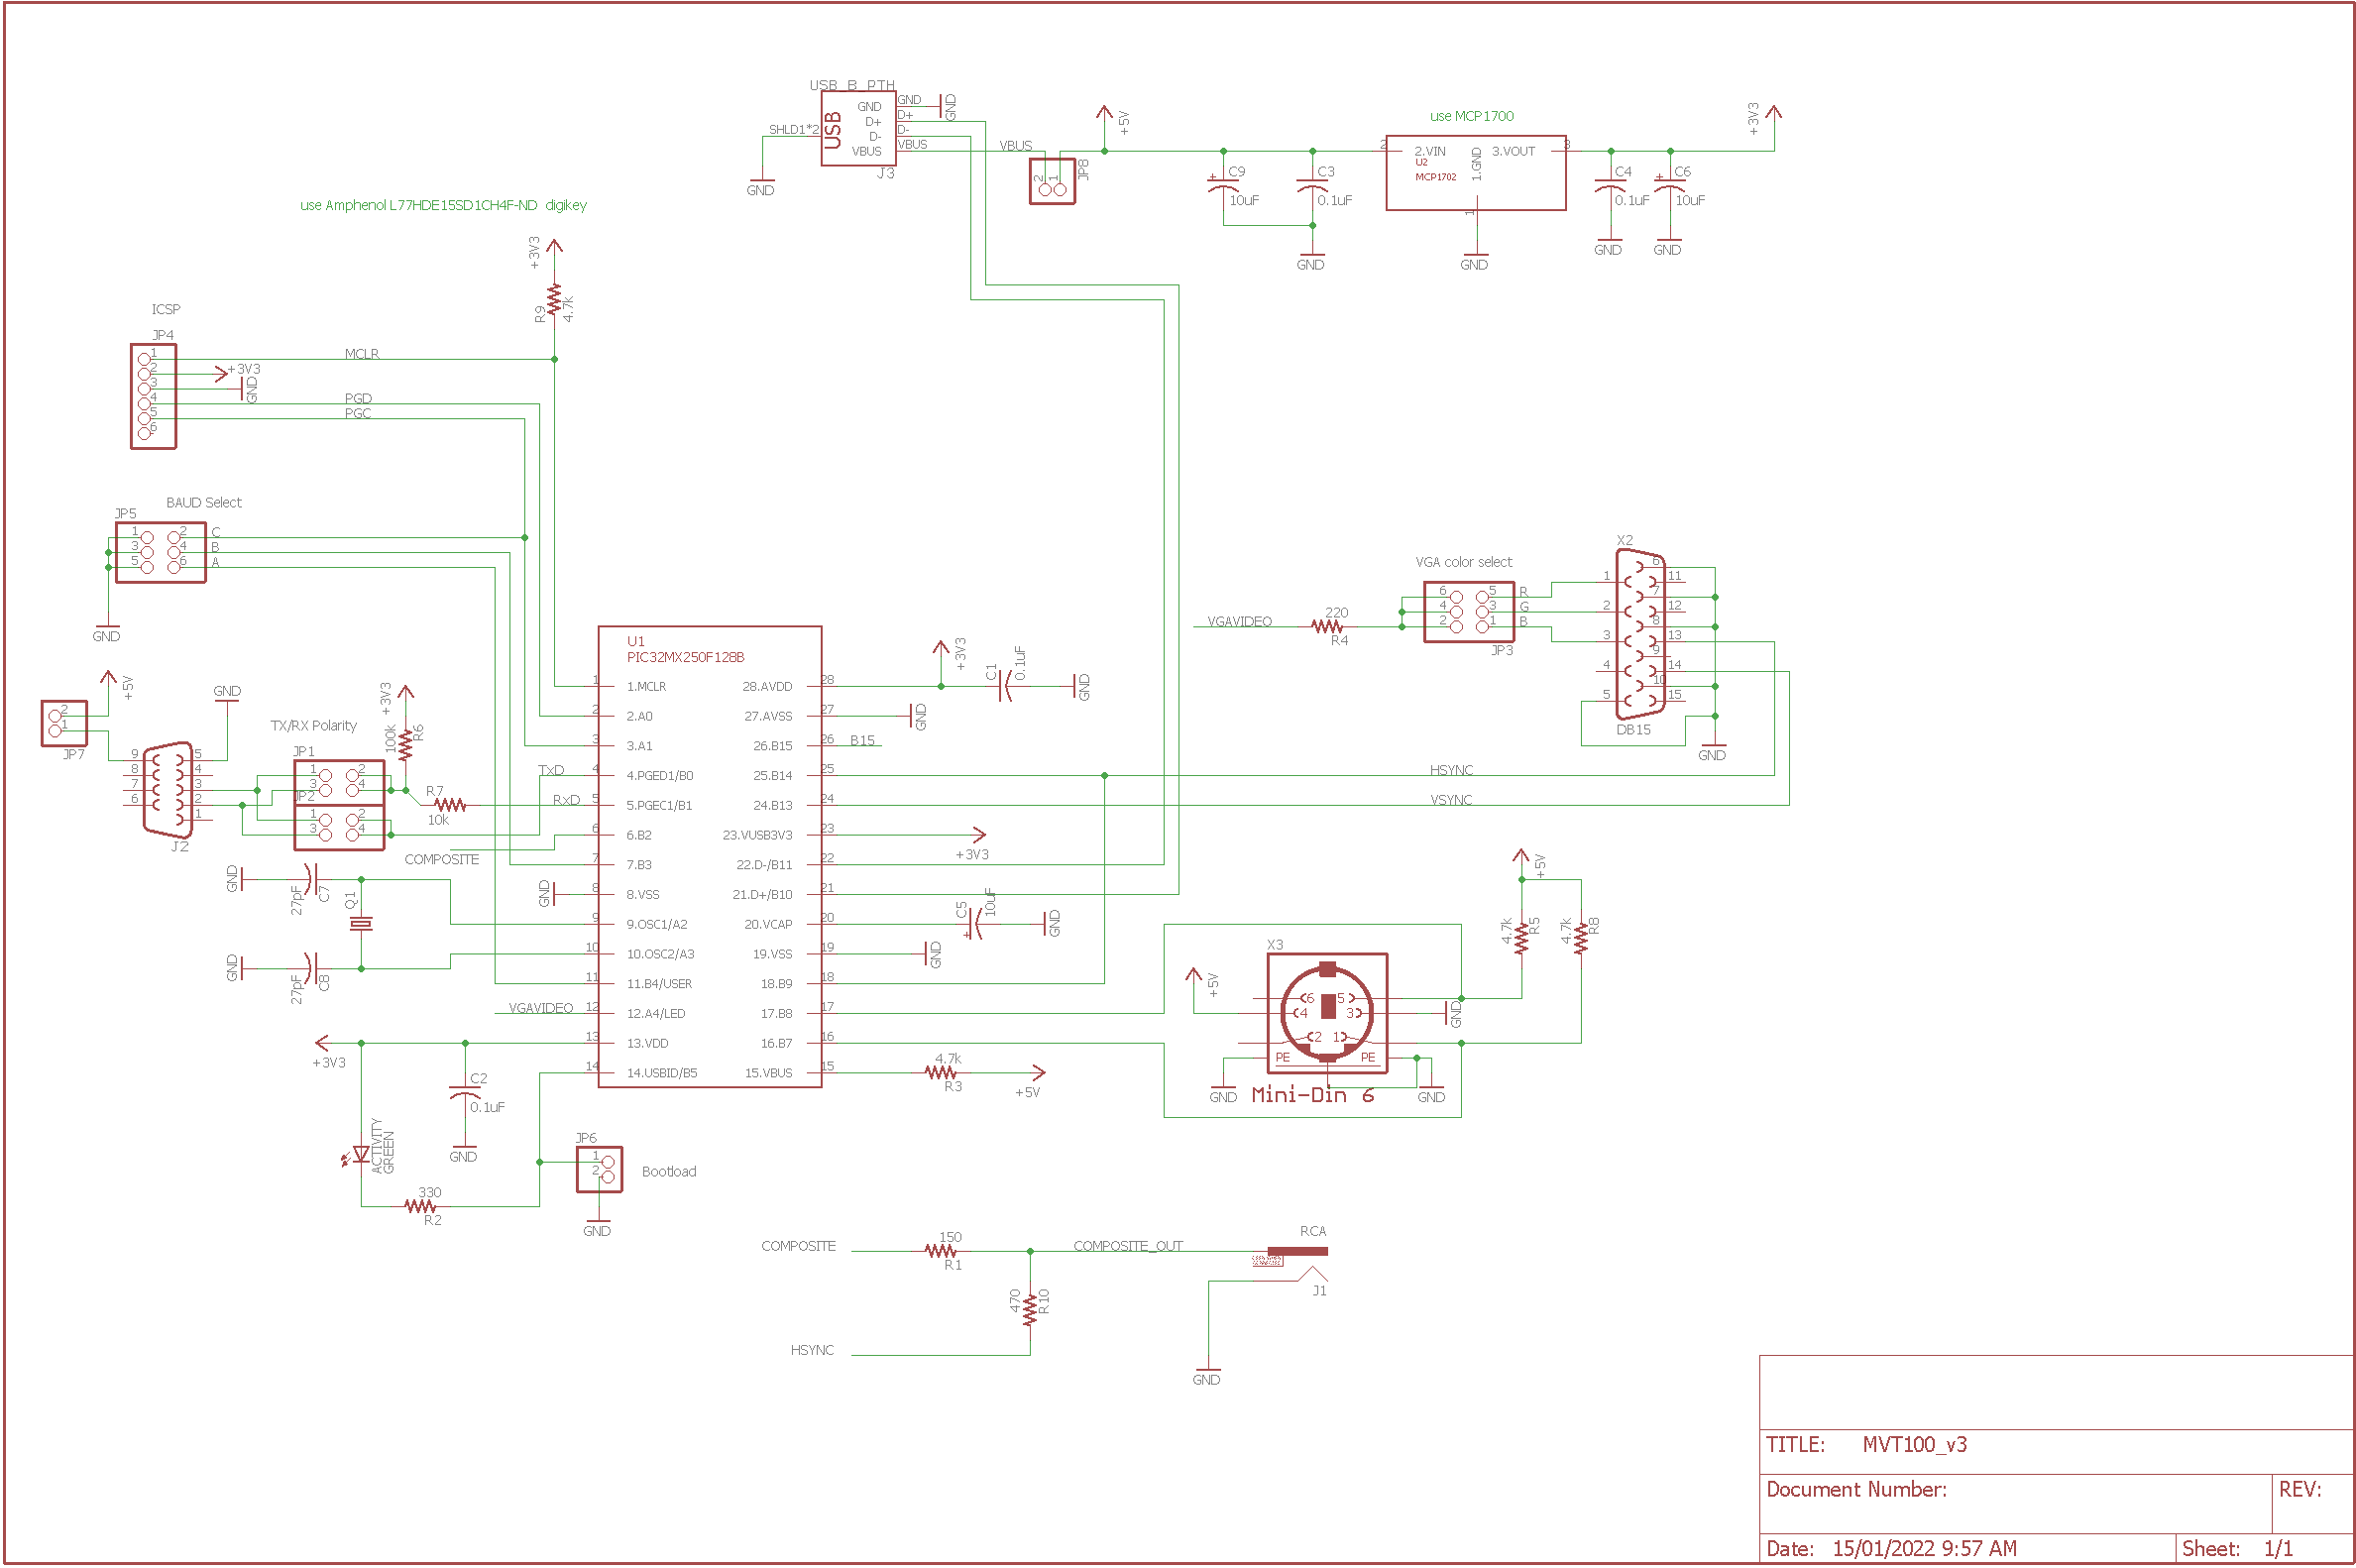
[[Image: | Schematic: | ||
[[Image:MVT100_v3.png||center]]<br/> | |||
=== Original Geoff VT100 Terminal Schematic === | === Original Geoff VT100 Terminal Schematic === | ||
| Line 115: | Line 173: | ||
<table border="1"> | <table border="1"> | ||
<tr><td>Model</td><td>Description</td><td>File</td><td>Revision</td></tr> | <tr><td>Model</td><td>Description</td><td>File</td><td>Revision</td></tr> | ||
<tr><td>M100/T102</td><td>VT100 Driver</td><td>[[Media:VT100_b22.zip|VT100 Driver]]</td><td>22</td></tr> | |||
<tr><td>M100/T102</td><td>VT100 Driver</td><td>[[Media:VT100.zip|VT100 Driver]]</td><td>19</td></tr> | <tr><td>M100/T102</td><td>VT100 Driver</td><td>[[Media:VT100.zip|VT100 Driver]]</td><td>19</td></tr> | ||
<tr><td>M100/T102</td><td>VT100 Driver Source</td><td>[[Media:VT100source.zip|VT100 Driver Source Code]]</td><td>19</td></tr> | <tr><td>M100/T102</td><td>VT100 Driver Source</td><td>[[Media:VT100source.zip|VT100 Driver Source Code]]</td><td>19</td></tr> | ||
<tr><td>support files</td><td>VT100 Driver Source</td><td>[[Media:Files you need.zip|Supporting Source Code]]</td><td>circa 2015</td></tr> | <tr><td>support files</td><td>VT100 Driver Source</td><td>[[Media:Files you need.zip|Supporting Source Code]]</td><td>circa 2015</td></tr> | ||
</table> | </table> | ||
| Line 170: | Line 231: | ||
I based the Model 100 variant of the firmware on Version 1.3 as posted by Geoff at his site. | I based the Model 100 variant of the firmware on Version 1.3 as posted by Geoff at his site. | ||
I have two files here: (1) the firmware itself, ready to load into an existing | I have two files here: (1) the firmware itself, ready to load into an existing MVT100 and (2) the modified project. The modified firmware is compatible with both the original Geoff VT100 terminal as well as my board of course. | ||
I followed Geoff's guidance for tools etc. needed to build the firmware. | I followed Geoff's guidance for tools etc. needed to build the firmware. | ||
I recommend that anyone looking to reflash an existing VT100 Adapter, please follow the instructions at Geoff's site. | I recommend that anyone looking to reflash an existing <VT100 Adapter, please follow the instructions at Geoff's site. | ||
You do not need a programmer; you need to connection via USB to a Windows PC and run the Micrchip Bootloader application. | You do not need a programmer; you need to connection via USB to a Windows PC and run the Micrchip Bootloader application. | ||
'''January 16, 2021 Release V1.3.2_SA_jrafont_34''' | |||
Contributed by Jim Anderson! thanks Jim! | |||
Changes: | |||
1) modified font to align perfectly with M100 | |||
<table border="1"> | |||
<tr><td>What is it</td><td>Description</td><td>File</td><td>Revision</td></tr> | |||
<tr><td>MVT100 Adapter Firmware</td><td>M100 fonts V1.3.2_SA-jrafont34 </td><td>[[Media:MVT100_FW_V132JRA_34.zip|MVT100 Firmware]]</td><td>jrafont-34</td></tr> | |||
</table> | |||
'''December 23, 2020 Release V1.3.2_SA Build 23''' | |||
Changes: | |||
1) modified scrollup/down to work better with TEXT | |||
2) fixed ability to launch .BA and .DO directly into SCREEN1/2 | |||
<table border="1"> | |||
<tr><td>What is it</td><td>Description</td><td>File</td><td>Revision</td></tr> | |||
<tr><td>MVT100 Adapter Firmware</td><td>bugfix V1.3.2_SA </td><td>[[Media:MVT100_FW_V132SA.zip|MVT100 Firmware]]</td><td>23</td></tr> | |||
</table> | |||
'''Original Release V1.3.1_SA Build 19:''' | |||
<table border="1"> | <table border="1"> | ||
<tr><td>What is it</td><td>Description</td><td>File</td><td>Revision</td></tr> | <tr><td>What is it</td><td>Description</td><td>File</td><td>Revision</td></tr> | ||
<tr><td> | <tr><td>MVT100 Adapter Firmware</td><td>First release V1.3.1_SA / M100 support </td><td>[[Media:VT100_FW.zip|MVT100 Firmware]]</td><td>19</td></tr> | ||
<tr><td> | <tr><td>MVT100 Adapter Project</td><td>Modified V1.3 Project files/ M100 support </td><td>[[Media:VT100_project.zip|MVT100 Terminal Project]]</td><td>19</td></tr> | ||
</table> | </table> | ||
| Line 240: | Line 327: | ||
I changed the cursor to be a block rather than a line. | I changed the cursor to be a block rather than a line. | ||
=== MVT100 Desktop Application === | |||
The functionality of the hardware MVT100 adapter can now be emulated on a PC. | |||
Please go to the following page for more information: | |||
[[MVT100 Desktop Application]] | |||
[[Category:Model T Video]] | [[Category:Model T Video]] | ||
Latest revision as of 14:30, 23 November 2023
What is this all about?
When the Model 100 was released, it was offered with another product called the Disk Video Interface, which provided dual 5.25 floppy drives and ability to support an 80x25 CRT. It was well integrated with M100 OS, with several command s that extended BASIC's ability to control the CRT.
The Model 100 lends itself well to an attached terminal acting as a video adapter, and it turns out that a project provided by Geoff Graham of Perth Australia comes very close to fitting the need.
http://geoffg.net/terminal.html
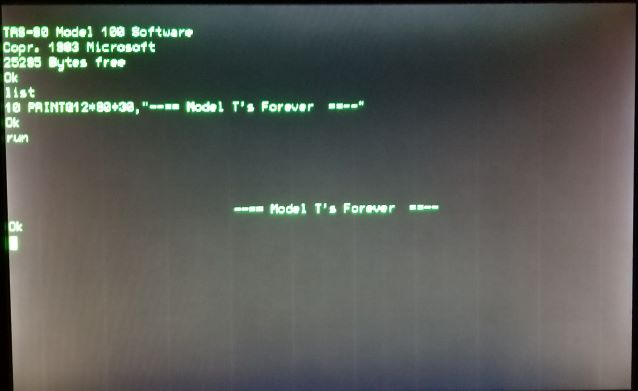
This project (plus some minor extensions), combined with some disassembly and reconstruction work on Disk Basic, has yielded a very nice external VGA video solution for Model 100!
Get in touch with me at Twospruces at --the google mail service.
How to order MVT100
MVT100 is a minor redesign of the original VT100 board. I offer this as a kit. The major difference is (1) the upgraded firmware for Model 100 support and (2) I have included an RS-232 connector to simplify interconnection with the Model 100.
How to order --->Ordering Information
  Geoff Graham's VT100 video adapter kit optimized for use with M100.
  Notes:
  *  Requires an RS-232 cable to connect from laptop to video adapter.  Adapter has a female DB-9 connector.
  *  Requires USB power supply
  *  Compatible with REX#/REXCPM (version 2.1 or newer software)
  *  For native M100 use, requires VT100 driver software to be installed in Laptop.
  *  M100 CP/M is ready to use MVT100 out of the box!
  *  Kits require assembly - soldering skills required!
Acknowledgements
I would like to acknowledge and thank those that have contributed to the project:
Jim Anderson - for his efforts to improve the font set for MVT100 to match M100!
Ken Pettit - for VirtualT, and the core disassembly of Disk Basic
Philip Avery - for efforts with CP/M and attached Video using the VT100 Adapter
Geoff Graham - for the original VT100 Terminal Project
Supported Models
- TRS-80 Model 100, Tandy 102
Assembly and Set up Primer
Steve Baker, ModelT enthusiast, has been an early adopter of the MVT100 video adapter. He has kindly pulled together his experiences in assembling and setting up the MVT100. This document will be very very useful to anyone looking to follow his footsteps!
Thanks Steve!
MVT100 Assembly and Configuration Guide
   Keep in mind that Version 3 PCB has 2 new jumpers.  JP7 and JP8.
   JP8 selects power from USB.
   JP7 selects power from pin 9 of the RS-232 connector.
Mini How-To
Here is a quick summary of how to get this working:
  1.  You need a Geoff VT100 Terminal.  Get one of these, and get my latest firwmware below.
  IMPORTANT: follow the instructions at Geoff's site for how to get your VT100 terminal working.
  Instructions for that are not repeated here.
  2.  Flash upgrade my firmware onto it following Geoff's instructions.
      PS - it sorta works stock so you can play around with it, without the firmware update.
      It just isn't "right".
  3.  Connect a VGA monitor to the VT100 Terminal.
  4.  Power up the MVT100 Video Adapter with USB or otherwise.
  5.  Configure the MVT100 Video Adapter as follows
      -  57600 baud if using the BCR TTL SERIAL HACK or
      -  19200 8N1 if using normal RS-232.  Don't forget to invert the data (PS2 keyboard Shift F12)
  6.  Connect M100 to MVT100 Video Adapter.  If using RS-232, this is fairly straightforward.
      If using the BCR TTL SERIAL HACK, you need to make a cable
      This is the hardest part.  "Stock" VT100 adapter uses a 4 pin header to connect serial data.
      My board design has a native RS-232.
      In any case; you have to sort out how to connect these up.
  7.  Load and install the VT100 Driver into the M100.
  You should be ready to go!  Enter BASIC, type SCREEN 1 (for RS-232) or SCREEN 2 (for BCR/CASSETTE)
  SCREEN 0 returns you to normal screen.  From BASIC, F8 returns to MENU which is always LCD, and from
  there TEXT and TELCOM also use 80x24.
  NOTE:
  * You can test your VT100 terminal using TELCOM.
For some fun, you can try the original STARTREK.BAS on the M100!
   make sure you CLEAR 1000 for variable space
   Also, load the .BA.  The .DO is so large it can't be converted in M100 memory.
   You could load the .DO version using TS-DOS using LOAD"0:TREK.DO"
   Make sure you are in 80 column mode on CRT!
MVT100 Hardware
There are several sources for the original VT100 Adapter, and modified variants. I have developed a PCB version (MVT100) that is, I think, most convenient for Model T users as it has a native DE-9 connector for serial data connection.
   I have revised the design to V3.
   This design adds two power jumpers.
   These jumpers allow the MVT100 to be powered from USB or the DE-9.
   USB power - place JP8 and remove JP7.
   DE-9 power pin 9 - place JP7 and remove JP8.
   Why did I add the power jumpers?
   Well, the M100 can supply enough current from it's internal 5V power supply.
   Since the BCR port has 5V on pin 9, you can avoid using USB altogether.
   Easier to connect, less wires etc.
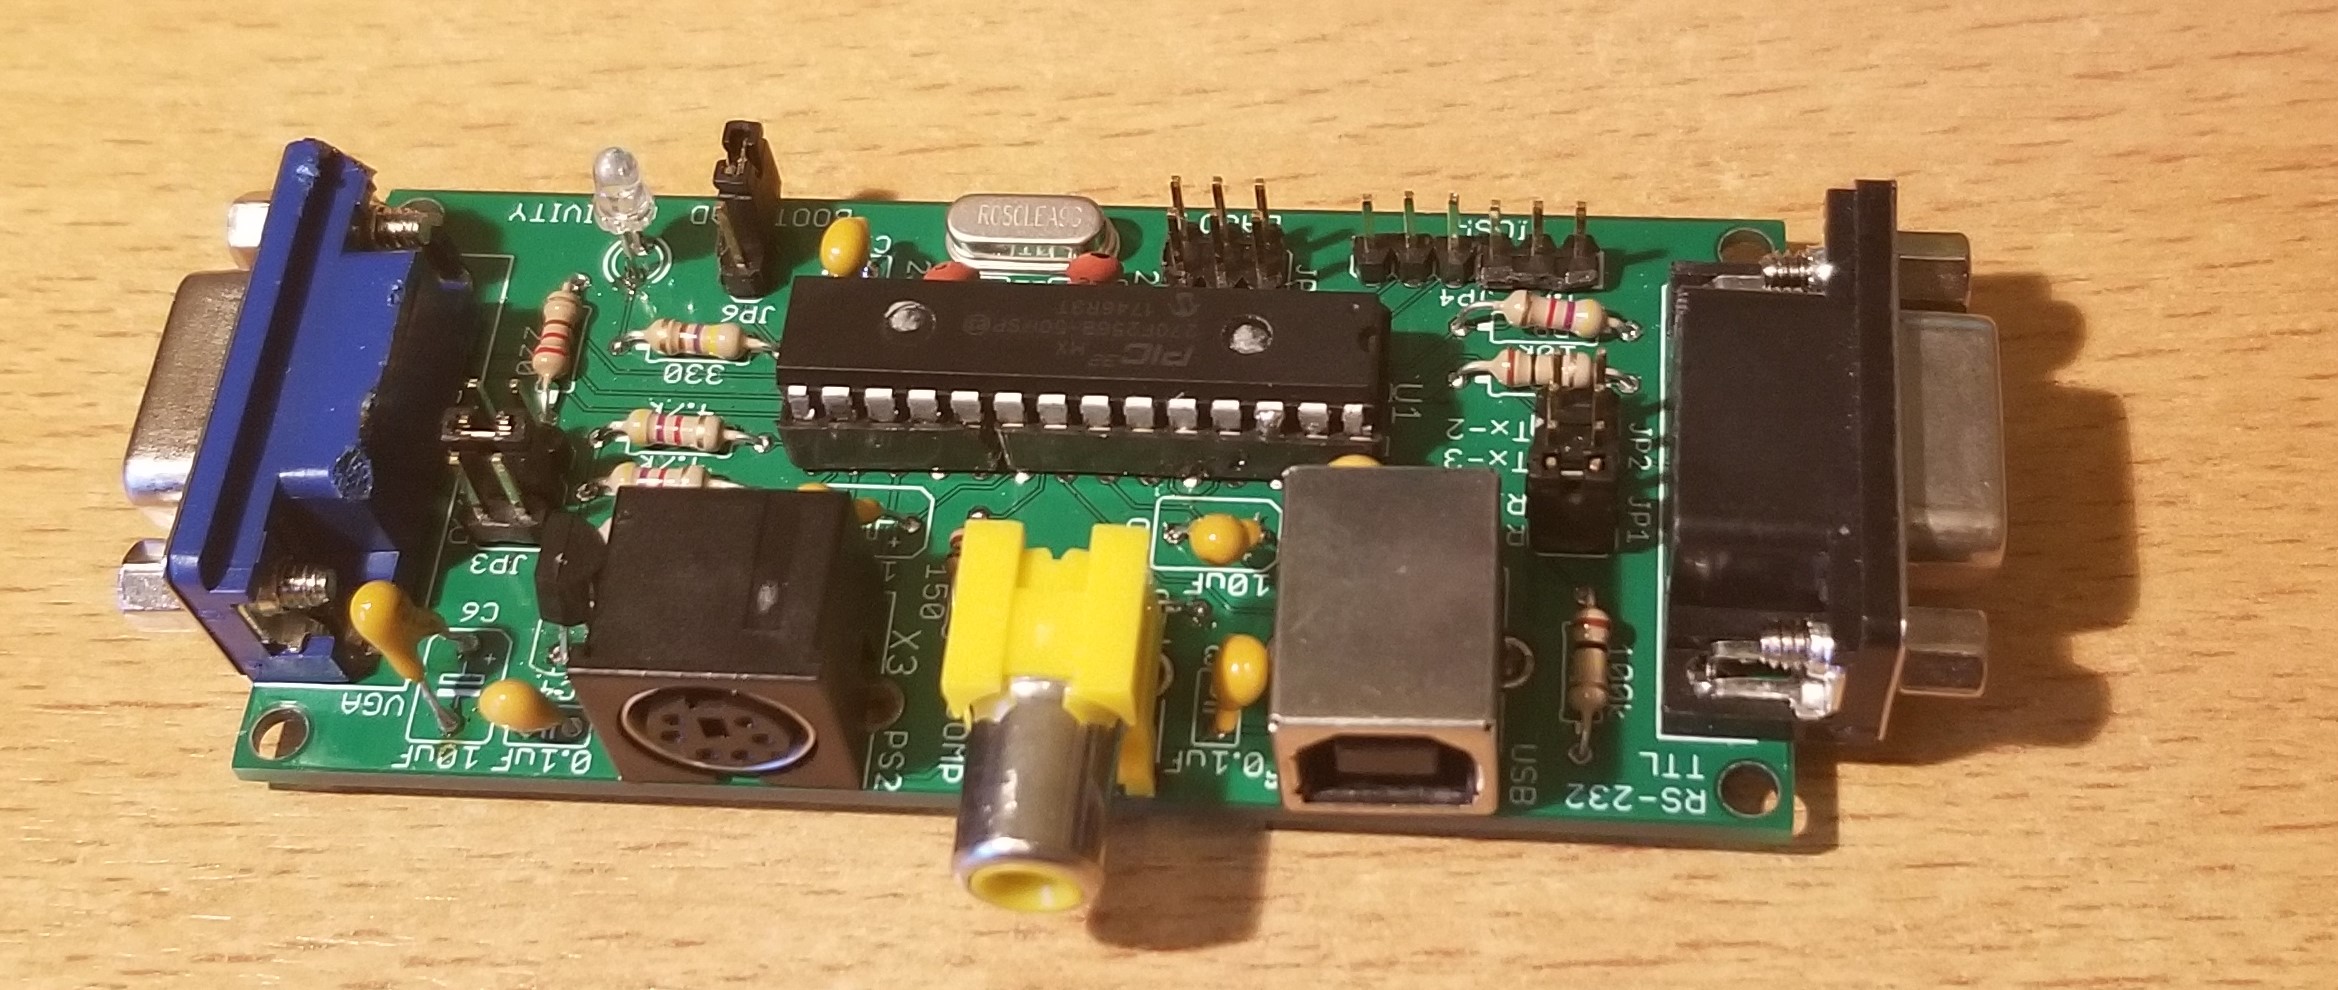
Contact me to obtain a kit for MVT100, my variant of the VT100 Adapter, including the controller pre-programmed with the revised firmware.
Other sources are available. See http://geoffg.net/terminal.html and https://www.tindie.com/products/petrohi/geoffs-vt100-terminal-kit/
Note that these boards need a custom cable to connect with the M100.
   This solution makes good use of the "BCR TTL SERIAL HACK".
   Why? Because the serial port can be kept for file I/O while driving the
   monitor with direct TTL serial data at 57600.
CP/M on the Model 100 also leverages this output mechanism for video.
Please see BCR TTL SERIAL HACK for more information.
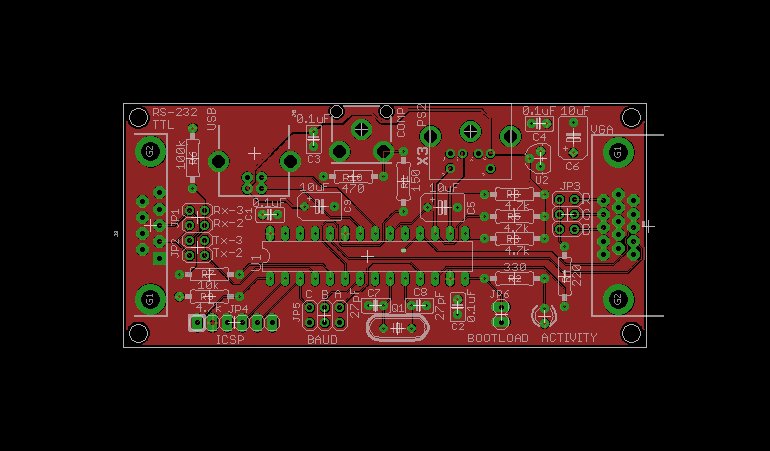
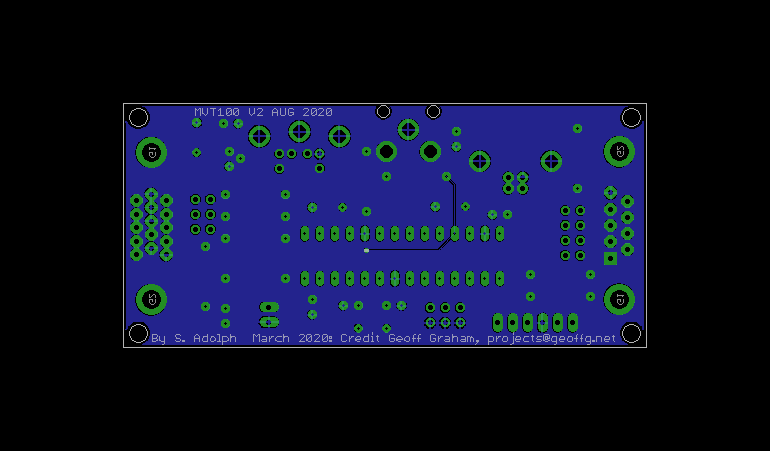
MVT100 PCB Version 2 (no longer supplied)
PCB images:
Schematic:
MVT100 PCB Version 3 (January 2022)
PCB images:
Schematic:
Original Geoff VT100 Terminal Schematic
...please see http://geoffg.net/terminal.html
The Software
The solution requires some software. Generally, you require 1. VT100 Driver software: stand alone equivalent of "Disk Basic" tailored for the VT100 Adapter 2. A patched version of the firmware for the VT100 Adapter, needed to enable certain M100 specific functions.
VT100 Driver
The following table has links to the current VT100 Driver software and source code.
| Model | Description | File | Revision |
| M100/T102 | VT100 Driver | VT100 Driver | 22 |
| M100/T102 | VT100 Driver | VT100 Driver | 19 |
| M100/T102 | VT100 Driver Source | VT100 Driver Source Code | 19 |
| support files | VT100 Driver Source | Supporting Source Code | circa 2015 |
Installation:
NOTE: installation of the driver resets the DATE and TIME on your laptop.
  1. load VT100.CO into your Model 100.
  2. Enter BASIC, and issue command
  CLEAR 0, 60000
  3. Return to MENU, cursor over to VT100.CO and hit ENTER.
The VT100 Driver code is now installed. You can delete VT100.CO; the code is installed in uppper RAM.
I recommend downloading the Disk Video Interface User Guide to learn about how the DVI commands work. The VT-100 driver is essentially replicates the functionality, with a few differences:
  SCREEN command:
  Format of command is SCREEN X,Y
  X = 0, -> LCD
  X = 1, -> CRT attached to RS-232 port, 19200 8N1
  X = 2, -> CRT attached to "the BCR/Cassette port hack", Serial TTL at 57600 bps
WIDTH command: not functional. CRT is pinned at 80x24.
Also, support for printing the CRT contents to Printer is not implemented.
VT100 Driver compatibility with other M100 software
VT100 Driver ties into the M100 hooks table including the CHGET hook, which is used by REX. As a result it is tightly integrated with M100 OS but it is not compatible as it currently stands with other software that also uses these resources.
Hooks that are used by the VT100 Driver are as follows:
   44H		CRT PUT -  called at 14FA in M100
   40H		CRT OPEN  -  called at 14F8 in M100
   08H		RST 4 -- Print A to SCREEN - called at 4317 in M100, starting at RST4 / 4B44
   04H		CHGET - called at 12D4 (CHGET routine - wait for keyboard input)
   3CH		Initialize LCD/DVI - called from level 3 character print
   3EH		SCREEN - called from 1E50
   00H		CLEAR
   02H		MAXRAM
Here's some examples of incompatible programs:
  Any option ROM that uses hooks may be incompatible
  REX - not currently supported
  TS-DOS: incompatible with SCREEN 1 or 2.  Seems to work with SCREEN 0.  Not really tested.
MVT100 Terminal Firmware Update
I based the Model 100 variant of the firmware on Version 1.3 as posted by Geoff at his site. I have two files here: (1) the firmware itself, ready to load into an existing MVT100 and (2) the modified project. The modified firmware is compatible with both the original Geoff VT100 terminal as well as my board of course.
I followed Geoff's guidance for tools etc. needed to build the firmware.
I recommend that anyone looking to reflash an existing <VT100 Adapter, please follow the instructions at Geoff's site. You do not need a programmer; you need to connection via USB to a Windows PC and run the Micrchip Bootloader application.
January 16, 2021 Release V1.3.2_SA_jrafont_34
  Contributed by Jim Anderson!  thanks Jim!
  Changes:
  1) modified font to align perfectly with M100
| What is it | Description | File | Revision |
| MVT100 Adapter Firmware | M100 fonts V1.3.2_SA-jrafont34 | MVT100 Firmware | jrafont-34 |
December 23, 2020 Release V1.3.2_SA Build 23
  Changes:
  1) modified scrollup/down to work better with TEXT
  2) fixed ability to launch .BA and .DO directly into SCREEN1/2
| What is it | Description | File | Revision |
| MVT100 Adapter Firmware | bugfix V1.3.2_SA | MVT100 Firmware | 23 |
Original Release V1.3.1_SA Build 19:
| What is it | Description | File | Revision |
| MVT100 Adapter Firmware | First release V1.3.1_SA / M100 support | MVT100 Firmware | 19 |
| MVT100 Adapter Project | Modified V1.3 Project files/ M100 support | MVT100 Terminal Project | 19 |
For convenience, I post here two items:
Instructions for upgrading the firmware of the VT100 Terminal via USB
Upgrade Instructions
The PC utility from Microchip for connecting to and flashing the controller chip
Upgrade Utility
Comments about VT100 Terminal support for Model 100
VT100 character set is only set up for ASCII 127 and lower. The extended character set of the Model 100 is not supported. If someone feels motivated, what is needed is a new Fonts.h file that contains a new character set. VT100 uses a 6x12 pattern while M100 uses 5x8. So some surgery needed there.
The Model 100 uses ESCape codes to manage the CRT. Those are published in the DVI manual.
Many of the codes could be mapped to the codes supported by VT100.
6 codes however were not available in VT100, so that's why new firmware was needed.
   ; escape code mappings
   ;				ModelT		extended	Stock VT100
   ;                            ------          --------        -----------
   ;	double ESC trap		X		eliminated in VT100 driver.
   ;	home			0BH				[H
   ; 	cls			0CH				[2J + [H
   ; 	lock line 8		T		[T
   ;	unlock line 8		U		[U
   ;	lock scroll		V		[V
   ;	unlock scroll		W		[W
   ; 	turn on cursor		P				[?25h
   ; 	turn off cursor		Q				[?25l
   ;	delete line@cursor	M		[M
   ;	insert blank line	L		[L
   ; 	erase to EOL		K				[K
   ; 	set reverse char	p				[7m
   ; 	reset reverse char	q				[0m
   ;	cursor up		A				[A
   ;	cursor down		B				[B
   ;	cursor right		C				[C
   ;	cursor left		D				[D
   ;	erase to end of page	J				[J
   ;	set cursor location	Y,c,r				[<v>;<h>f
   ; 	cls			E				[2J + [H
   ;	cls		 	j				[2J + [H
   ;	erase current line	I				[2K
   ;	vertical tab		H				[H
Other notes:
I changed the cursor to be a block rather than a line.
MVT100 Desktop Application
The functionality of the hardware MVT100 adapter can now be emulated on a PC.
Please go to the following page for more information:
